Now this is an article which will make the hearts of test automation engineers beat faster. In our last blog, we have talked about the opportunity enabled by AI-based testing, where amongst other things we demonstrated running an UFT tests on a windows machine where no UFT Installation existed. Today we are going even above the limits and will explain how you can execute UFT GUI tests on a Ubuntu machine. What? No this is not a typo, yes on a Ubuntu machine, on a Linux operating system.
With the latest UFT One release (15.0.1) and its embedded Artificial Intelligence (AI) engine, you can cover many use cases, which were never discovered before.
The Linux operating system was so far a ‘No-Go’ area for Windows UI Test Automation Tools. Cross OS GUI tests were not possible at all for Java apps supporting not only windows but also other operating systems. Micro Focus huge investment in the AI-based Testing has changed the territory for Test Automation and test automation engineer can explore their current limits and go beyond it using UFT One AI based testing approach.
In our use case we will use the browser based RDP access to accomplish this use case. It is very important to access the remote desktop you want to automated using a browser based RDP. We have tried the following browser based RDPs:
Chrome RDP – Chrome Remote Desktop is fully cross-platform. Provide remote assistance to Windows, Mac and Linux users, or access your Windows and Mac desktops at any time, all from the Chrome browser on virtually any device, including Chromebooks.
Skytap Cloud – Skytap Cloud is an enterprise service purpose-built for the development and testing of complex applications.
VMware Horizon – Using VMware Horizon™ HTML Access Web client 4.1, you can connect to remote desktops and applications without having to install any software on your client system.
Find as follow the architecture view of what we have prepared to evaluate this use case.
In order to make UFT run a GUI (graphical user interface) test on a Ubuntu (Linux operating system), we have installed the following virtual machines:
Windows Client with UFT One and embedded AI engine
Ubuntu machine with postman as the application under test
The test we created was on a publicly available REST API for accessing weather data for any location. This api will be consumed by the native linux app postman in our demonstration test case.
The demonstration was only with one machine, but long term solution could have multiple client machines with different operating systems running.
The client architecture could have a Mac-book, CentOS, Debian, Ubuntu, Windows and other operating system. On none of the client machine UFT One + AI need to be installed, the only key criteria is the RDP access based on a browser. The AI engine will set the context based on the browser and recognize the objects.
We have recorded a demo video where UFT One executes a GUI test on Ubuntu machine using Postman as the application under test.
This capability is not an officially supported feature of UFT One 15.0.1. AI engine. It has been evaluated as part of the community content and summarized in this blog.
There have been many discussions around where Artificial Intelligence can help speed up the testing process. In this short video, we will show you, how you can use the UFT AI features together with ALM Octane to accelerate the testing process by shifting left and start the test design even before the application exists. ALM Octane will act as the management tool, while as UFT will cover the design areas for test automation.
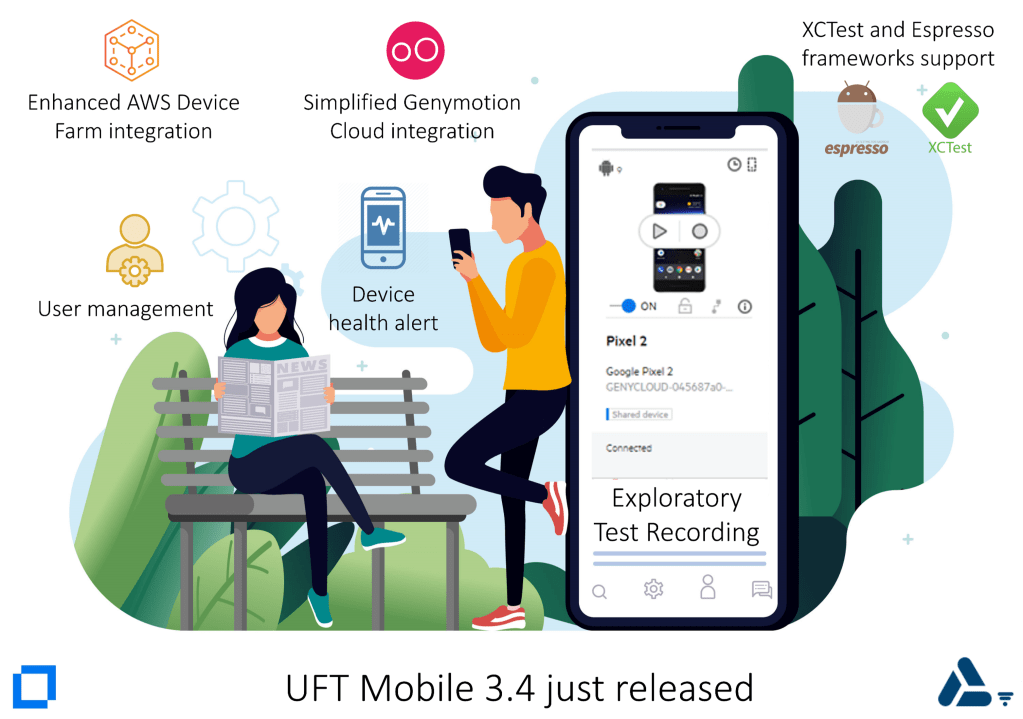
It includes a number of new features, enhancements, and fixes. – Exploratory test recording – Enhanced AWS Device Farm integration – Simplified Genymotion Cloud integration – XCTest and Espresso frameworks support – Device health alert – New workspace admin role – User management – Other enhancements and updates – Supported integrations – Appium
#UFT #Mobile. Amplify team productivity with an enterprise-level, end-to-end lab of real mobile devices and emulators.
#Enterprise-grade #lab #management Scalable solution that supports multiple projects and campaigns in the enterprise organization for virtual cross-functional and cross-geography teams
#App and #browser #testing and #monitoring Run manual, automated, performance and security mobile app tests on real mobile devices for native, hybrid and web mobile apps and execute cross-browsers use cases
#Centralized #gateway Full control of all mobile apps, devices, and emulators across the organization, segregated to workspaces
#Scalable #deployment Deploy on-premise or in a hybrid infrastructure, leverage local or cloud-hosted mobile devices.
#Continuous #improvement and #optimization Analyze the usage and provide metering information for the system utilization to support business decisions
Selenium VS #UFT #Developer: Speed Test, which tool is faster in execution?
;o)
Last week, I was configuring the ALM Octane test #runners for my demo environment with the usecase having 2 or more test automation tools part of the #ALM #Octane #test #suite. I started with tests of Selenium and UFT Developer and put both within one test suite of ALM Octane. I created the same tests with both of the tools and during execution i saw that UFT Developer is minimum twice as fast as Selenium.
However this post is about test runners, which you can configure in ALM Octane for the testing tool of your choice.
Trigger #automated #test runs in your #testing #framework
This integration enables #ALM #Octane to run tests in your testing framework via your #CI server.
This is useful in a number of scenarios. For example, suppose your CI server ran #automated #nightly #tests and the ALM Octane #pipeline shows that a specific test #failed. After #pushing a #fix you can run the specific test directly from ALM Octane, rather than running the full pipeline which can be time-consuming.
This integration enables ALM Octane to run tests in your testing framework via your CI server.
Trigger #automated #test runs in your #testing #framework
This integration enables #ALM #Octane to run tests in your testing framework via your #CI server.
This is useful in a number of scenarios. For example, suppose your CI server ran #automated #nightly #tests and the ALM Octane #pipeline shows that a specific test #failed. After #pushing a #fix you can run the specific test directly from ALM Octane, rather than running the full pipeline which can be time-consuming.
The ALM Octane-testing framework integration includes the following steps:
#Create a job in your CI server. To set up the integration, create a job on your CI server to run tests on your testing framework.
#Create a test runner in ALM Octane. In ALM Octane settings, create a test runner entity that corresponds to this job on your CI server.
#Run tests. In ALM Octane, create a test suite that includes tests that you want to run in your testing framework, and run the suite. ALM Octane triggers the test runs via the job in the CI server.
#Analyze release and product quality. Track the test results as part of the overall data in the backlog, quality, and dashboard modules.
This integration enables ALM Octane to run tests in your testing framework via your CI server.
This is useful in a number of scenarios. For example, suppose your CI server ran automated nightly tests and the ALM Octane pipeline shows that a specific test failed. After pushing a fix you can run the specific test directly from ALM Octane, rather than running the full pipeline which can be time-consuming.
In this article, the testrunner is configured for MAVEN & JENKINS.
Overview
Pre-requisites
Configure a Jenkins job
Create TestRunner in ALM Octane
Run Tests from ALM Octane
Conclusion
Pre-requisites
In order to configure the test runners with ALM Octane, make sure you have a testing framework in place with Maven, Gradle or Protractor and the automated test cases are being executed properly within the framework.
You must have a CI server connected to ALM Octane. For more details, see Set up CI servers.
Within ALM Octane, create a pipeline to inject tests from your testing framework via your CI server. For more details, see Create and configure pipelines.
Out-of-the-box, the integration supports the following frameworks via Jenkins, Bamboo, or Team City:
JUnit and TestNG tests over Maven
Protractor
Gradle
Using the Jenkins plugin version 5.9 or later, you can trigger automated runs in other frameworks using the Custom option, as described below.
You must have a CI server connected to ALM Octane.
This example show a Jenkins pipeline with 80 automated tests. Lets assume, from 80 tests in a future job run 5 tests fails, and you want to run only the failed tests instead of the whole pipeline, then you would need test runners.
Step 1 – Create a job on your CI server to run tests in your testing framework
On your CI server, create a job that runs specific tests on your testing framework.
In addition to the command to run tests on your framework, this job must include the testsToRun parameter. The testsToRun parameter receives a lists of tests from ALM Octane that the job will then run. The parameter uses the following syntax: v1:package name|classname|testname;packagename|classname|test name.
You will then need to convert the contents of this parameter to a syntax that can be used by your testing framework.
In addition to the testsToRun parameter, add the following to your job in Jenkins:
Publish JUnit test result report post-build action.
Create – On your CI server, create a job that runs specific tests on your testing framework.
Create a job of type “Freestyle Project” in Jenkins.
Parametrize – On the job add the testsToRun parameter
Add a build tasks in Jenkins
In addition to the testsToRun parameter, add the following to your job in Jenkins.
Micro Focus ALM Octane testing framework converter – this should be before running your Maven goal. It makes sense to previously check, if Maven is running the tests using mvn from the commandline.
Add an additional build task after the framework converter:
Invoke top-level Maven targets directly after the tasks Micro Focus ALM Octane testing framework converter.
Add Post Build Task – Publish JUnit test result report post-build action.
Step 2: Create a test runner in ALM Octane
After the job has been configured on your CI Server, goto the workspace configuration under the DevOps section to add a new test runner.
In ALM Octane, click Settings > Spaces and select a workspace.
Select the DevOps > Test Runners tab.
Click + Test Runner.
Define a name for the test runner, for example JUnit Runner.
Select your testing framework, for example JUnit.
Select your CI server.
Select the job that you created in the CI server to run the tests in your testing framework. The list displays the jobs that have the testsToRun parameter.
Click Save. ALM Octane creates a test runner to trigger the job that runs your tests.
If you build is parametrized, ALM Octane will show the default dataset with all the parameters and their default values. You can define additional parameter sets by adding (“+”) a new set. For example, this makes sense when you want to run same test on different environments with different users.
Step 3: Run tests from ALM Octane
Assign test runners to tests in the Quality module. You can then add the tests to test suites and run them from ALM Octane.
ALM Octane triggers test runs via the job in the CI server that is specified in the test runner. After adding tests to a suite you can select a different test runner for a test in the suite. In addition, after planning a suite you can select a different test runner for a test run.
A suite can include automated tests using multiple test runners. When a suite includes both manual tests and automated tests, the automated tests run in the background while you perform the manual tests.
When you run a test, its status in ALM Octane is Planned until the test runner starts to run the tests in the CI server. The test’s status changes to In Progress, until the test results are returned to ALM Octane.
Identify failed tests from pipeline run
Once there are test failures during a pipeline run, perform your failure analysis and fix the problem and run only the failed tests using the defined test runners.
Create a new Test Suite in ALM Octane
You want to run after the fix only the 5 tests and not the comeplete pipeline. To do this, create a new test suite in ALM Octane for the failed tests. These tests can be executed by different testing tools and frameworks. The mapping between tests and testrunners happens in the test suite.
Select the Test Runner for the Tests
For instance, if your pipeline had test execution from UFT One, UFT Developer, Selenium, SoapUI and JUnit Tests, then you could define test runners per testing tool or testing framework. You can decide which test would be part of the next run.
Run the Testuite
Enter the name of this Run.
Press „Lets run“ to run the suite.
ALM Octane will start the test execution and the selected tests will be executed.
The test suite will run directly from ALM Octane.
You can track the execution state in the suite run under the RUNS tab.
Track the Results ALM Octane
Test Runner will report the execution result to ALM Octane.
In case your tests are parametrized, you need to select the correct dataset when planning the suite run.
Conclusion
Test runners are a great approach to execute test cases directly from ALM Octane. It allows users to drilldown on tests that matter to validate a fix instead to run the full pipeline including all automated tests. It also allows a flexible way to integrate test automation tools of your choice and implement the transition from manual testing to automated testing in an integrated way by linking manual tests to its corresponding automated tests directly in ALM Octane.
This allows you to capture the transition from manual to automated testing on a timeline to better understand the automation coverage towards continuous testing.
The Dev Access plugin (Android) and app (iOS) provide a user-friendly interface for connecting to and interacting with devices in the UFT Mobile lab, from within your integrated development environment (IDE). Instead of connecting to local physical devices or emulator, UFT Mobile Dev Access allows you to connect to a complete Lab of devices with different operating systems, devices modes & types. This increases the experience for a developer working from windows, Linux or Mac.
In this article, we will use the following system components:
Windows 10
IDE: IntelliJ 2019.03
UFT Mobile is on Windows Server 2016
Connecting Android Device
Step 1: Download Android Platform Tools
In order to work with Android, we need to install the android platform tools. These tools are required for Android app development.
Download the correct SDK Platform Tools for your operating system. In this article, we have used Windows as the operating system. After download, extract the files somewhere on the development machine.
Step 2: Make sure you can connect to UFT Mobile
In order to connect to UFT Mobile lab, make sure you can access UFT Mobile from any browser of your choice. Just open browser and enter the UFT Mobile url (http[s]://<uftm-server>:<port>).
Step 3: Install UFT Mobile plugin for IntelliJ
This plugin allows you to easily connect UFT Mobile lab devices to your IDE, for debugging, and to view and control them remotely. Search for the plugin directly from your IDE – goto File > Settings > Plugins and search for “UFT Mobile“. Select the plugin and click on Install. After Installation your IDE will restart. Once restarted, check the plugin was installed. To do this, go to View > Tool Windows > UFT Mobile from your IDE.
Step 4: Get API Access for UFT Mobile
In order to establish a connection to UFT Mobile, you need to have an API Access Key. You can generate this API Access Key in your UFT Mobile. To get an API Key,
Login to UFT Mobile
Goto Settings > API Access and click on + Generate new
Save the key in a file, so in case you need it again, you can look it up.
Step 5: Configure the initial setting and connect to UFT Mobile
After everything is prepared and installed, go to your IDE and open the UFT Mobile tool window.
Click on Settings and enter the following:
URL of UFT Mobile Lab Server, format http[s]://<uftm-server>:<port>
UFT Mobile Server API Key, i.e. “client=oauth2-WFGujYpKlq8sadasd2Wv@microfocus.com; secret=35asdwq1324dsf12L2a2K; tenant=919219959;”
Proxy if needed
ADB Execute able – the extracted download from step 1. You need to point to the adb.exe file
After the data is entered, click on Log in to connect to UFT Mobile.
Step 6: Connect to Android Devices
After logging into UFT Mobile, you now need to Enable the UFT Mobile Dev Access under the Tab Devices. Select a workspace if needed and select the device you want to connect to from the devices list in your IDE.
After the successful connection, you will be redirected to the Remote Viewer, which is embedded in your IDE and have full access to the Device you connected with using UFT Mobile.
UFT One provides a default set of emulated devices, which can be used for responsive web applications. This allows UFT One users to perform cross browser testing on desktop browsers and on emulated devices by their pre-defined resolution and agents.
UFT One uses google chrome emulator to emulate the devices. You can set this option in UFT One under RECORD > RECORD AND RUN SETTINGS.
The devices are collected from the EmulatedDevices.xml file under <UFT installation folder>/bin folder. Out of the box UFT One provides 30+ emulated devices. If you want to use more emulated devices, you can download the EmulatedDevices.xml from GitHub: https://github.com/a1m0ctane/EmulatedDevices.
Simply copy the downloaded EmulatedDevices.xml file into your <UFT installation folder>/bin folder. after copying, restart UFT One to load the latest configuration of chrome emulated devices.
See UFT One cross browser testing with emulated devices in action:
All available devices:
Amazon Kindle Fire HDX, Amazon Kindle Fire HDX 7, Amazon Kindle Fire HDX 8.9, Apple iPad, Apple iPad Mini, Apple iPad Mini 4, Apple iPad 3|4, Apple iPad 10, Apple iPad 10 Pro, Apple iPad 12 Pro, Apple iPhone 4, Apple iPhone 5, Apple iPhone 6, Apple iPhone 6 Plus, Apple iPhone SE, Apple iPhone 7, Apple iPhone 7 Plus, Apple iPhone 8, Apple iPhone 8 Plus, Apple iPhone X, Apple iPhone XR, Apple iPhone Xs, Apple iPhone Xs Max, Apple iPhone 11, Apple iPhone 11 Pro, Apple iPhone 11 Pro Max, BlackBerry PlayBook, BlackBerry Z10, BlackBerry Z30, Google Nexus 10, Google Nexus 4, Google Nexus 5, Google Nexus 6, Google Nexus 7, Google Pixel 3, Google Pixel 3 XL, Google Pixel 4 XL, LG Optimus L70, LG Optimus 2X|3D|Black, LG Optimus G, LG Optimus LTE|4X HD, LG Optimus One, Laptop with HiDPI screen, Laptop with MDPI screen, Laptop with touch, Nokia Lumia 520, Nokia N9, Nokia Lumia 7X0|8XX|900|N800|N810|N900, Nokia C5|C6|C7|N97|N8|X7, Motorola Defy|Droid|-X|Milestone, Motorola Droid|4|Razr|Atrix 2|4G, Motorola Droid Razr HD, Motorola Xoom|Xyboard, Samsung Galaxy Note 3, Samsung Galaxy Note III, Samsung Galaxy Note II, Samsung Galaxy Note 8, Samsung Galaxy Note 9, Samsung Galaxy Note 10, Samsung Galaxy Note 10+, Samsung Galaxy S4, Samsung Galaxy S5, Samsung Galaxy S6, Samsung Galaxy S7, Samsung Galaxy S8, Samsung Galaxy S8+, Samsung Galaxy S9, Samsung Galaxy S9+, Samsung Galaxy S10, Samsung Galaxy S10+, Samsung Galaxy S10e, Samsung Galaxy Tab 7.7|8.9|10.1, Samsung Galaxy Tab, Sony Xperia S – Ion, Sony Xperia Sola – U, Sony Xperia Z – Z1, HTC Evo|Touch HD|Desire HD, HTC One X|EVO LTE, HTC Sensation|Evo 3D